The idea of re-compiling OpenCV came up when I was using OpenCV for keypoint detection. The official OpenCV tutorial for Python is not that in detail. Only several CPU-based keypoint detection algorithms are mentioned in the document, which results in the high usage of CPU and long time consumption. However, when I get into the OpenCV C++ document, I found several implementations of functions utilizing GPU’s power.
So in this article, I note the compile process and give some examples of the warped OpenCV functions in Python. Leveraging the hardware acceleration, i.e., the GPU implementation of the SURF algorithm gets about 5.5 times faster than the CPU implementation.
Ⅰ. Preparation
OpenCV stands for Open Source Computer Vision Library. It is written in C++ and provides API for C++, Python, MATLAB, etc. Aiming for the GPU acceleration, some dependencies are needed here.
Dependences
The OpenCV in this article is compiled with:
| Name | Description |
|---|---|
| Visual Studio 2017 | runtime |
| CMake 3.19.2 win64 | configure |
| MSDK2020R1 | Intel Quick Sync hardware video encoder/decoder |
| CUDA 11.0.2 | CUDA binaries |
| cuDNN | DNN |
| Video Codec SDK 11.0.10 | NVIDIA Video Codec SDK |
| OpenCV 4.5.1 | OpenCV source main |
| OpenCV_contrib 4.5.1 | OpenCV source contrib |
| Anaconda | Python environment |
1. Install Anaconda
-
Remember to choose Register Anaconda as my default Python.
-
After the installation, install numpy before compiling OpenCV.
conda install -y numpy
2. Install Visual Studio 2017
- Choose to install “Desktop development with C++”.
3. Install CUDA and cuDNN
- Install CUDA with default settings.
- Unzip cuDNN, copy the
bin,includeandlibfolder to where you install CUDA, default path isC:\Program Files\NVIDIA GPU Computing Toolkit\CUDA\v11.0.
4. Install CMake
- Choose “Add Cmake to the system PATH for the current user”
5. Prepare OpenCV source
- OpenCV source main is a self-extract file. Extract to some folder, i.e.,
C:\, the exe file will create the folderC:\opencv. - Unzip OpenCV source contrib.
- Copy the modules to
C:\opencv\modules.
6. Install Intel Media SDK
The Intel Media SDK provides the hardware acceleration on Fourcc MPG2, H264, X264, AVC , H265, or HEVC. The video can be decoded/ encoded by cv2.CAP_INTEL_MFX.
- Install MSDK2020R1 with default settings.
7. Integrate Nvidia Codec SDK
With Nvidia Codec SDK, we can use cv2.cudacodec.VideoReader() to help us decode the video.
- Unzip the zip file
- Copy
Lib/x64/nvcuvid.libtoC:\Program Files\NVIDIA GPU Computing Toolkit\CUDA\v11.0\lib\x64, copyLib/Win32/nvcuvid.libtoC:\Program Files\NVIDIA GPU Computing Toolkit\CUDA\v11.0\lib\Win32 - Copy the
.hfiles in folderInterfacetoC:\Program Files\NVIDIA GPU Computing Toolkit\CUDA\v11.0\include
Ⅱ. Build OpenCV
We need to build OpenCV with several steps.
1. Configuration
-
Choose the source and build folder.
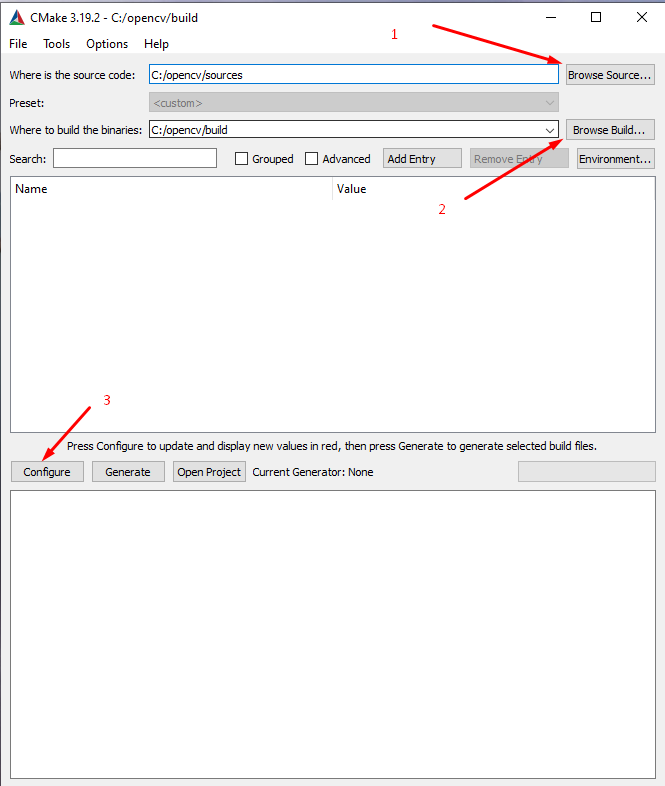
-
Click
Configure.
2. Configuration
-
Choose the generator and the platform.
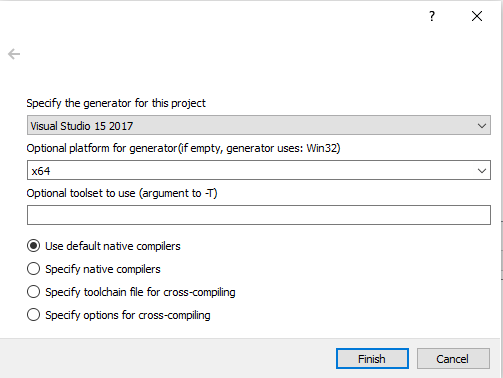
-
The configuration would take a while.
3. Configuration
- Check the parameters in the table:
| Name | Value |
|---|---|
| ENABLE_FAST_MATH | ON |
| INSTALL_CREATE_DISTRIB | ON |
| OPENCV_ENABLE_NONFREE | ON |
| OPENCV_EXTRA_MODULES_PATH | C:/opencv/modules |
| WITH_CUDA | ON |
| WITH_MFX | ON |
| WITH_OPENGL | ON |
| WITH_OPENMP | ON |
- Click
Configureagain.
4. Configuration
- When CMake is busy with configuration, we can check the GPU Compute Capability. For a shorter compilation process, we can specify the compute capability of the GPU. For example, the compute capability of Geforce RTX 2070 is 7.5.
| Name | Value |
|---|---|
| CUDA_ARCH_BIN | 7.5 |
| CUDA_ARCH_PTX | 7.5 |
| CUDA_FAST_MATH | ON |
| WITH_NVCUVID | ON |
| BUILD_opencv_world | ON |
- Click
Configureagain.
5. Configuration
-
Check if NVCUVID and FAST MATH will be built.

-
Check if python3 is included in the OpenCV Modules.

-
Click
Generate. -
Go to
C:\opencv\build, call command prompt by the address bar. -
Compile with the command:
cmake.exe --build . --config Release --target INSTALL -
This would take a long time. Once finished, modify the system environment variables:
Action Variable Value Create OPENCV_DIR C:\opencv\build Create OPENCV_VER 451 Add PATH %OPENCV_DIR%\bin\Debug Add PATH %OPENCV_DIR%\bin\Release Add PATH %OPENCV_DIR%\install\x64\vc15\bin
Ⅲ. Python Bindings
- Go to the site-package of Anaconda, the default path is
C:\Users\{your name}\miniconda3\Lib\site-packages\cv2\python-3.8, change{your name}to your user name. - Copy the
cv2.cp38-win_amd64.pydtoC:\Users\{your name}\miniconda3\Lib\site-packages\. - Now you can
import cv2in the Anaconda base environment.
Ⅳ. Short Python Examples
It is a bit weird that now we need to write the Python program together with the OpenCV C++ document. ;)
CUDA Decoder
After we compile the NVCUVID module, we can now use the cv2.cudacodec.VideoReader() function now. With this function, we can directly capture the frames via GPU. The captured frame is of type cv2.cuda_GpuMat.
A CUDA video reader can be:
|
|
MediaSDK backend Decoder/Encoder
Once we have installed MSDK2020R1, we can call cv2.CAP_INTEL_MFX to help us decode or encode the video.
The media containers are still not supported by OpenCV, so before we use the Decoder, we need to transform the video to a certain format (.264, .h264, .mp2, .mpeg2, .265 or .hevc).
The official document introduces the method with FFmpeg tool.
# H264
ffmpeg -i video.avi -vcodec copy -an -bsf:v h264_mp4toannexb video.264
# H265
ffmpeg -i in.mkv -c:v copy -bsf hevc_mp4toannexb out.h265
After that, we can decode the video with cv2.CAP_INTEL_MFX.
|
|
We can also use the VideoWriter with cv2.CAP_INTEL_MFX.
|
|
Keypoint Detection Algorithm with CUDA
OpenCV provides SURF and ORB algorithms with both CPU and GPU implementations.
-
SURF CPU
-
the keypoints can be detected by:
1 2surf = cv2.xfeatures2d.SURF_create(100) kp, des = surf.detectAndCompute(img, mask)The input image is numpy array. Both keypoints and descriptors are in list format.
-
-
SURF GPU
-
the keypoints can be detected by:
1 2 3surf = cv2.cuda.SURF_CUDA_create(100) gpu_kp, gpu_des = surf.detectWithDescriptors(gpu_img, gpu_mask) kp = surf.downloadKeypoints(gpu_kp)The input image is a
cv2.cuda_GpuMat, the detected keypoints and descriptors are in GPU. The keypoints can be downloaded to the RAM via downloadKeypoints() method. The descriptors can be matched by GPU matcher or be downloaded to RAM via download() method.
-
I read 2 000 images three times on my computer with both algorithms, respectively. The result shows a significant improvement on GPU implementation.
| SURF (CPU) [sec] | SURF (GPU) [sec] | |
|---|---|---|
| 1 | 178.2835454940796 | 34.70819616317749 |
| 2 | 175.7257044315338 | 32.26314163208008 |
| 3 | 175.60720658302308 | 32.25424408912659 |
Ⅴ. Summary
OpenCV provides us many convenient functions. We can call them to finish the complex algorithms just with several lines.
With the GPU acceleration, we get a much faster algorithm with much lower CPU usage.
Since OpenCV 4 integrates the DNN module (possible with GPU backend), many Computer Vision algorithms can be called from DNN module, such as YOLOv4. These changes makes us more comfortable to enjoy the new computer vision technology, and integrate them into projects and improve our daily lives.
Thanks for everyone who contribute to the community!